Wireless USB Hub using Raspberry Pi
Wireless USB Hub using Raspberry pi
A wireless USB Hub is a very useful maker project. It is much more useful when you are working on boards and chords hat have to be plugged and unplugged every time. For instance, it makes my job much easier when I am working on a board like Arduino or Raspberry pi on an autonomous machine. I do not have to move the whole autonomous project up to connect to my system messing up with the servo positions. Instead, i can connect it to my wireless USB hub and start using it anytime.
Parts:
Before choosing the parts, we can finish this project with any of the raspberry pi boards. But i chose Raspberry pi 3 or Raspberry pi 0 w because they have WiFi chip-sets integrated on the board. It just reduces the setup time and extra electronic components hence cutting down cost. Again there is a decision to be made here. Raspberry pi 0 w has one micro USB port outlet where as Raspberry pi 3 has 4 USB A outlets. The procedure of setup is same on both the boards.
1) Raspberry pi 0 w or Raspberry pi 3: Amazon has some pi 0 w and pi 3 but they are cheaper in Microcenter.
2) Micro USB to USB A converter: Converter as we discussed in case we are using the Raspberry pi 0 w board.
3) Power supply for the Raspberry pi board.
4) Micro SD card for the Pi board (8GB recommended).
5) Monitor, Mouse and keyboard for initial setup.
Initial Setup:
1) Head to the Raspberry pi website and look for the download tab and look for the Noobs operating system and download it.
2) Format the micro SD card using the SDFormatter tool and copy the contents.
3) Insert the micro SD into the Raspberry pi.
4) Connect the board to the display and power it up.
5) Connect the board to WiFi using the user interface on the display
You can see the Noobs installing by itself asking you few simple basic options.
Server end:
Step 1:
Raspberry pi boards use the ARM processors with linux distribution.So, we should look for the appropriate package to be installed into the pi. Start up the pi and start with the initial update and upgrades in the terminal. The first time it takes a while.
A wireless USB Hub is a very useful maker project. It is much more useful when you are working on boards and chords hat have to be plugged and unplugged every time. For instance, it makes my job much easier when I am working on a board like Arduino or Raspberry pi on an autonomous machine. I do not have to move the whole autonomous project up to connect to my system messing up with the servo positions. Instead, i can connect it to my wireless USB hub and start using it anytime.
Parts:
Before choosing the parts, we can finish this project with any of the raspberry pi boards. But i chose Raspberry pi 3 or Raspberry pi 0 w because they have WiFi chip-sets integrated on the board. It just reduces the setup time and extra electronic components hence cutting down cost. Again there is a decision to be made here. Raspberry pi 0 w has one micro USB port outlet where as Raspberry pi 3 has 4 USB A outlets. The procedure of setup is same on both the boards.
1) Raspberry pi 0 w or Raspberry pi 3: Amazon has some pi 0 w and pi 3 but they are cheaper in Microcenter.
2) Micro USB to USB A converter: Converter as we discussed in case we are using the Raspberry pi 0 w board.
3) Power supply for the Raspberry pi board.
4) Micro SD card for the Pi board (8GB recommended).
5) Monitor, Mouse and keyboard for initial setup.
Initial Setup:
1) Head to the Raspberry pi website and look for the download tab and look for the Noobs operating system and download it.
2) Format the micro SD card using the SDFormatter tool and copy the contents.
3) Insert the micro SD into the Raspberry pi.
4) Connect the board to the display and power it up.
5) Connect the board to WiFi using the user interface on the display
You can see the Noobs installing by itself asking you few simple basic options.
Procedure:
Before heading on to the procedure, lets try to understand what are Server and Client end of the virtual here software.Server end:
Step 1:
Raspberry pi boards use the ARM processors with linux distribution.So, we should look for the appropriate package to be installed into the pi. Start up the pi and start with the initial update and upgrades in the terminal. The first time it takes a while.
sudo apt-get update
sudo apt-get upgrade
Step 2:
Now, we need to install the package as a server end for the pi. Go ahead and enter the following commands in the terminals.
wget http://www.virtualhere.com/sites/default/files/usbserver/vhusbdarm
The above command downloads thescripts needed to run the virtual server. Now we have to make this file an executable file.
chmod +x ./vhusbdarm
The file is now made executable.
Step 3:
Now to start the server, we need to start up the file and let it run in the background.
sudo ./vhusbdarm -b
Client End:
Step 1:
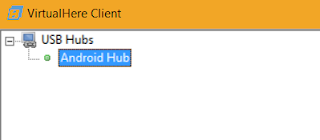
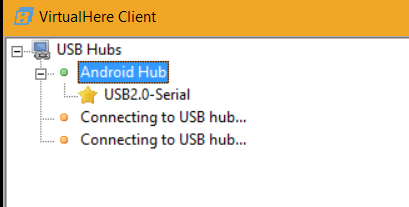
Download the virtual here client software from: Virtual Here Client and connect your client end on the same WiFi network as your raspberry pi is in.
Step 2:
Now, Plug in a USB device in the Pi board and it should be visible on the client end. Right click on the device name visible on the client end and say use this device.


Enhancements:
On startup:
Now, if we want to use this board just as a wireless USB hub, we can integrate this command with the boot up file so we do not have to give it the command every time we turn it on. For this, we should follow the below procedure.
Navigate to the home pi folder before doing anything.
Now, if we want to use this board just as a wireless USB hub, we can integrate this command with the boot up file so we do not have to give it the command every time we turn it on. For this, we should follow the below procedure.
Navigate to the home pi folder before doing anything.
cd ~
Create a file with the code we need entered into it.
sudo nano startupscript
Now enter the command to be executed at startup in the file.
sudo ./vhusbdarm -b
ctrl + X and Y to save the scripted file. Now, head to the .bashrc file to register this script to be executed at startup.
sudo nano .bashrc
At the end of the whole script that you find in it, type in the following command.
./startupscript
ctrl X and Y to save the file. Now try restarting your device. It should automatically execute the command on startup and you should be able to use the device wireless on just powering on the raspberry pi board.
It is just like the device is connected to your PC now except that it is through air. Nothing changes. We can use any device connected to the Pi board like as if it is directly connected to the PC.
References:
https://www.virtualhere.com/
It is just like the device is connected to your PC now except that it is through air. Nothing changes. We can use any device connected to the Pi board like as if it is directly connected to the PC.
References:
https://www.virtualhere.com/
Thanks for reading my blog. Hope this project worked out for you. If there are any difficulties or questions regarding this project or any other projects, please contact me at makersblog9594@gmail.com. You can also comment here. Please subscribe for several projects and hardware hacks.


Comments
Post a Comment